The DIY Guide to Perfect Shower Slopes Every Time
Install a Custom Shower Pan Slope Kit Without Guesswork
To install a custom shower pan slope kit, start with a clean, solid, level subfloor. Dry-fit the pan and drain, trim only within the maker's approved cut zones, then set the pan in full thin-set coverage. Check that every part of the floor falls continuously toward the drain before waterproofing, flood testing, and tiling.
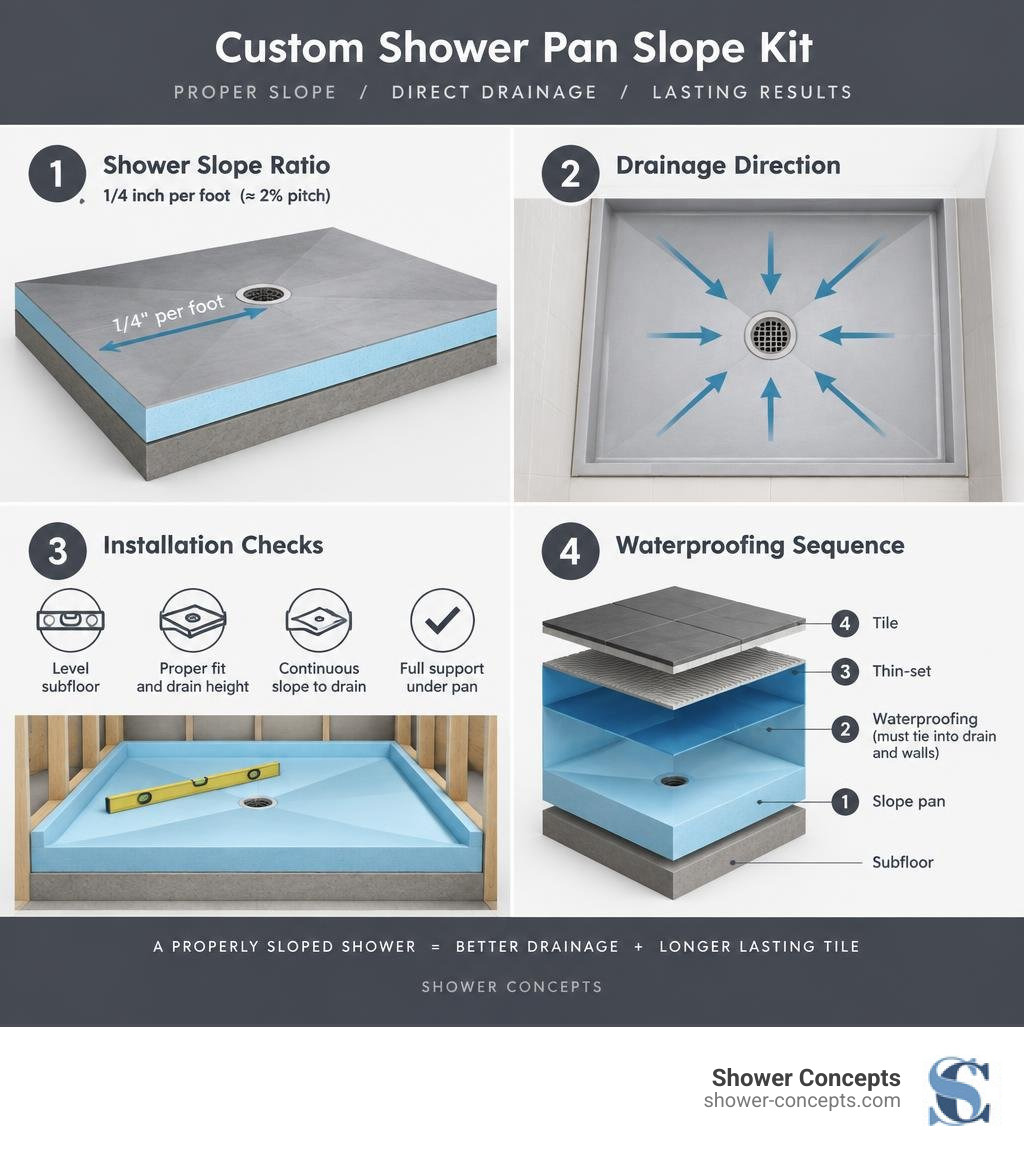
The target slope is typically 1/4 inch per foot, or about a 2% pitch. That drop moves water to the drain instead of leaving puddles that can lead to grout staining, tile failure, or moisture problems below the shower.
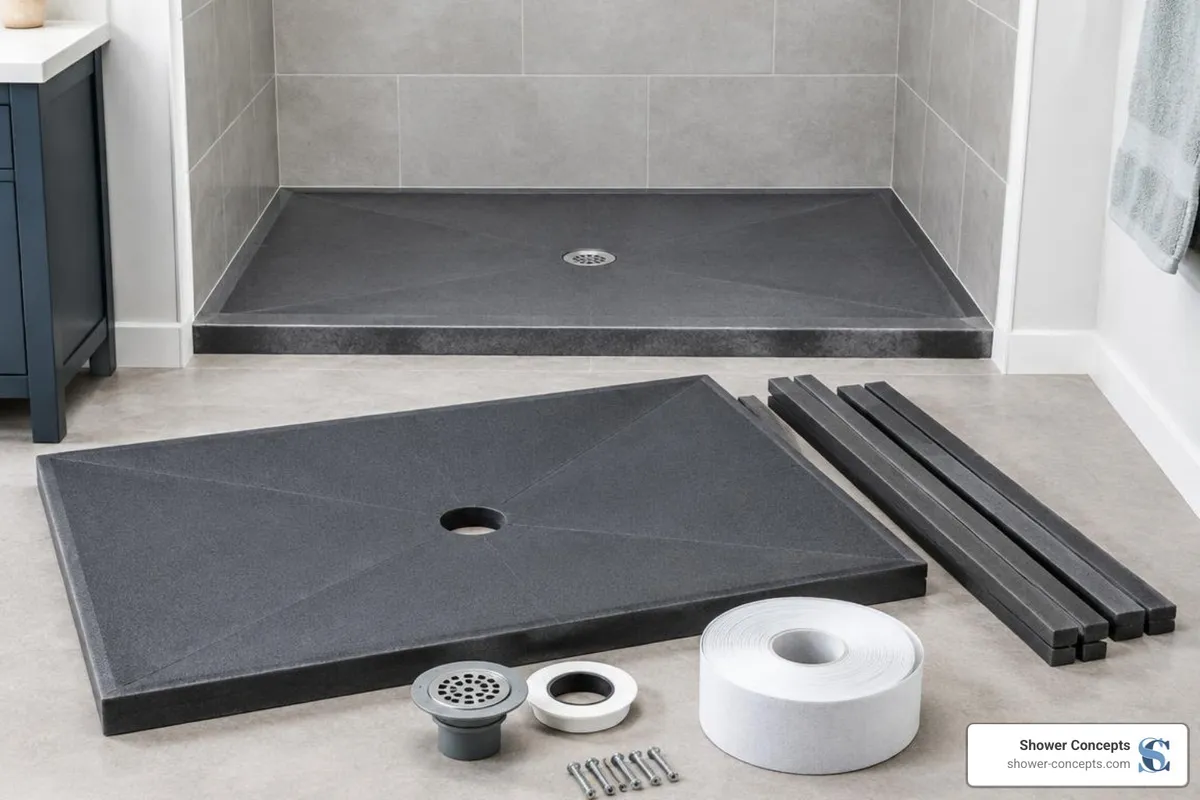
A custom foam pan makes this work faster than building a mortar bed from scratch. It is lightweight, pre-shaped for drainage, and can be made or trimmed for off-center drains, out-of-square walls, curbed showers, and level-entry designs. The key is simple: the pan must be fully supported, the drain must sit at the right height, and the waterproofing must tie into the drain and walls as one continuous system.
I am David Stewart, an owner and partner at Shower Concepts with more than 15 years of construction and tile-installation experience. I have helped contractors work through custom shower pan slope kit details, from drain placement and foam-pan fit to reliable waterproofing transitions.
What Is a Custom Shower Pan Slope Kit and How Does It Work?
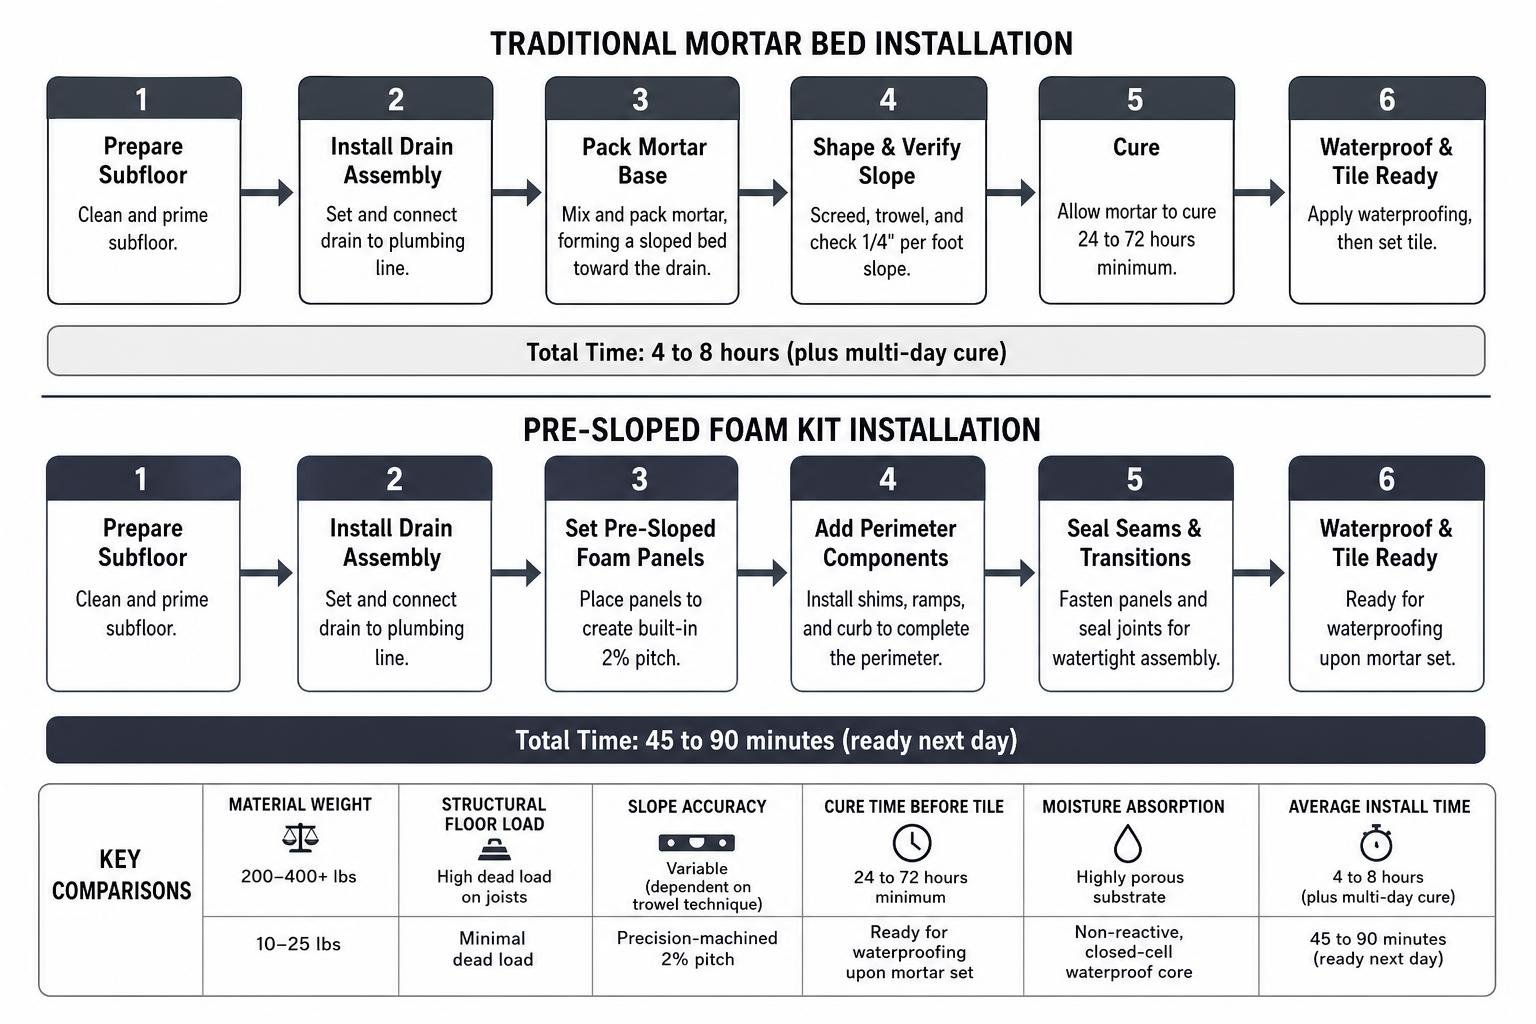
A custom shower pan slope kit is a prefabricated sub-tile foundation system engineered to provide a mathematically consistent pitch directly toward your drainage point. Traditionally, achieving proper drainage required hand-floating a heavy mortar "mud bed" using sand, cement, screed boards, and hours of troweling. While a skilled tile setter can pack a mortar bed successfully, mortar beds introduce significant variables: uneven curing, excessive structural weight, human error in the pitch, and lengthy dry times before waterproofing can begin.
Modern pre-sloped kits replace raw mortar with precision-milled extruded PET (polyethylene terephthalate) foam or high-density expanded polystyrene (EPS). These materials offer remarkable compressive strength—often rated around 145 PSI—meaning they can easily support heavy tile, heavy glass enclosures, and concentrated point loads without crushing, deflecting, or cracking under normal residential and commercial traffic.
Manufactured to meet stringent plumbing and structural standards such as IAPMO PS-106-2013, a custom-sloped base can be fabricated for almost any layout. Whether you are building a traditional curbed shower, a zero-threshold barrier-free wet room, or an irregular neo-angle footprint, these kits arrive pre-pitched to eliminate the guesswork from floor drainage.
Key Components of a Custom Shower Pan Slope Kit
A complete custom kit provides all structural and plumbing interface elements needed to transition from bare subfloor to a ready-to-tile surface:
Pre-sloped foam panels: The core foundation segments engineered with a built-in directional fall toward the drain cut-out.
Integrated drain assembly: A dedicated clamping collar or bonding flange system designed to mate seamlessly with standard plumbing lines.
Perimeter shims & transition ramps: Height-matching foam or synthetic components used to establish seamless barrier-free entries or level-line perimeters.
Shower curb: High-density foam curb profiles designed to prevent water breakout while accepting direct thin-set mortar and tile installation.
Hardware and sealants: Fasteners, polyurethane joint sealants, and waterproofing transition components required to tie the perimeter to adjacent backer boards.
When you work with a qualified shower installer or tackle the project as a confident DIYer, having every matching component in a single kit guarantees full physical and chemical compatibility across the entire floor assembly.
Benefits of Custom Shower Slope Kits
Transitioning from traditional mortar bases to custom engineered foam slope systems provides distinct performance and labor advantages:
Factor | Traditional Mortar Bed | Custom Foam Slope Kit |
|---|---|---|
Average Install Time | 4 to 8 hours (plus multi-day cure) | 45 to 90 minutes (ready next day) |
Material Weight | 200–400+ lbs | 10–25 lbs |
Structural Floor Load | High dead load on joists | Minimal dead load |
Slope Accuracy | Variable (dependent on trowel technique) | Precision-machined 2% pitch |
Cure Time Before Tile | 24 to 72 hours minimum | Ready for waterproofing upon mortar set |
Moisture Absorption | Highly porous substrate | Non-reactive, closed-cell waterproof core |
Calculating Proper Shower Slope and Drain Offsets
The primary goal of any shower pan is complete water evacuation. If water ponds against a perimeter wall, sits beneath tiles, or collects near the threshold, it quickly fosters mold, deteriorates grout joints, and eventually breaches perimeter waterproofing barriers.
Understanding the 1/4-Inch Per Foot Slope Rule
Building codes and Tile Council of North America (TCNA) guidelines require a continuous downward slope of 1/4 inch per foot (approximately a 2% gradient) from the furthest point of the shower perimeter to the edge of the drain.
Why 1/4" per foot? If the slope is shallower than 1/8" per foot, water tension will cause surface pooling on top of the tiles. If the slope exceeds 1/2" per foot, the floor feels uncomfortably steep, creating slip hazards and making tile layout difficult along wall intersections.
Point Drain Placement: A center point drain requires a "compound slope" (a 4-way funnel bowl effect), which demands smaller mosaic tiles to prevent tile lippage. Positioning the drain thoughtfully within the room layout keeps the compound slope consistent across every plane of the pan.
Accommodating Custom Footprints and Obstacles
In residential remodeling, drains are rarely situated in the geometric center of the room. Existing floor joists, plumbing stacks, electrical runs, or HVAC ductwork beneath the subfloor often dictate where the plumbing drop must remain.

When ordering or trimming a base:
Measure from the drain center to each surrounding wall. In an offset 36" x 60" shower where the drain sits 12" from one wall and 48" from the opposite wall, the furthest point dictates the maximum perimeter height.
Verify wall squareness. Measure diagonally from corner to corner. If the room is out of square by 1/2 inch, choose an oversized custom-sloped base that features an approved perimeter cut zone.
Preserve the perimeter height. Trim the edges of the pan rather than the area around the drain bowl so that your outer edges match evenly across the perimeter walls.
How to Build Your Custom Shower Base
Installing an engineered foam pan does not require masonry skills, but it does require careful subfloor preparation and strict adherence to thin-set coverage standards.
Required Tools and Materials Checklist

Gather these tools before beginning:
Tools:
4-foot spirit level and torpedo level
1/4" x 3/8" square-notched or 1/2" U-notched trowel
Utility knife with heavy-duty replacement blades or a fine-tooth handsaw
Tape measure and carpenter's square
Plumbing hole saw and PVC/ABS pipe cutter
Clean 5-gallon mixing buckets and heavy-duty drill with mixing paddle
Materials:
Custom pre-sloped foam shower pan kit
ANSI A118.4 or ANSI A118.15 polymer-modified thin-set mortar
PVC/ABS pipe solvent cement and primer
ANSI A118.10 liquid or bonded sheet waterproofing membrane
Waterproof fabric banding and preformed inside/outside corner seals
Polyurethane construction sealant
Step-by-Step: Installing Your Custom Shower Pan Slope Kit
Follow this step-by-step sequence to ensure structural stability and reliable drainage:
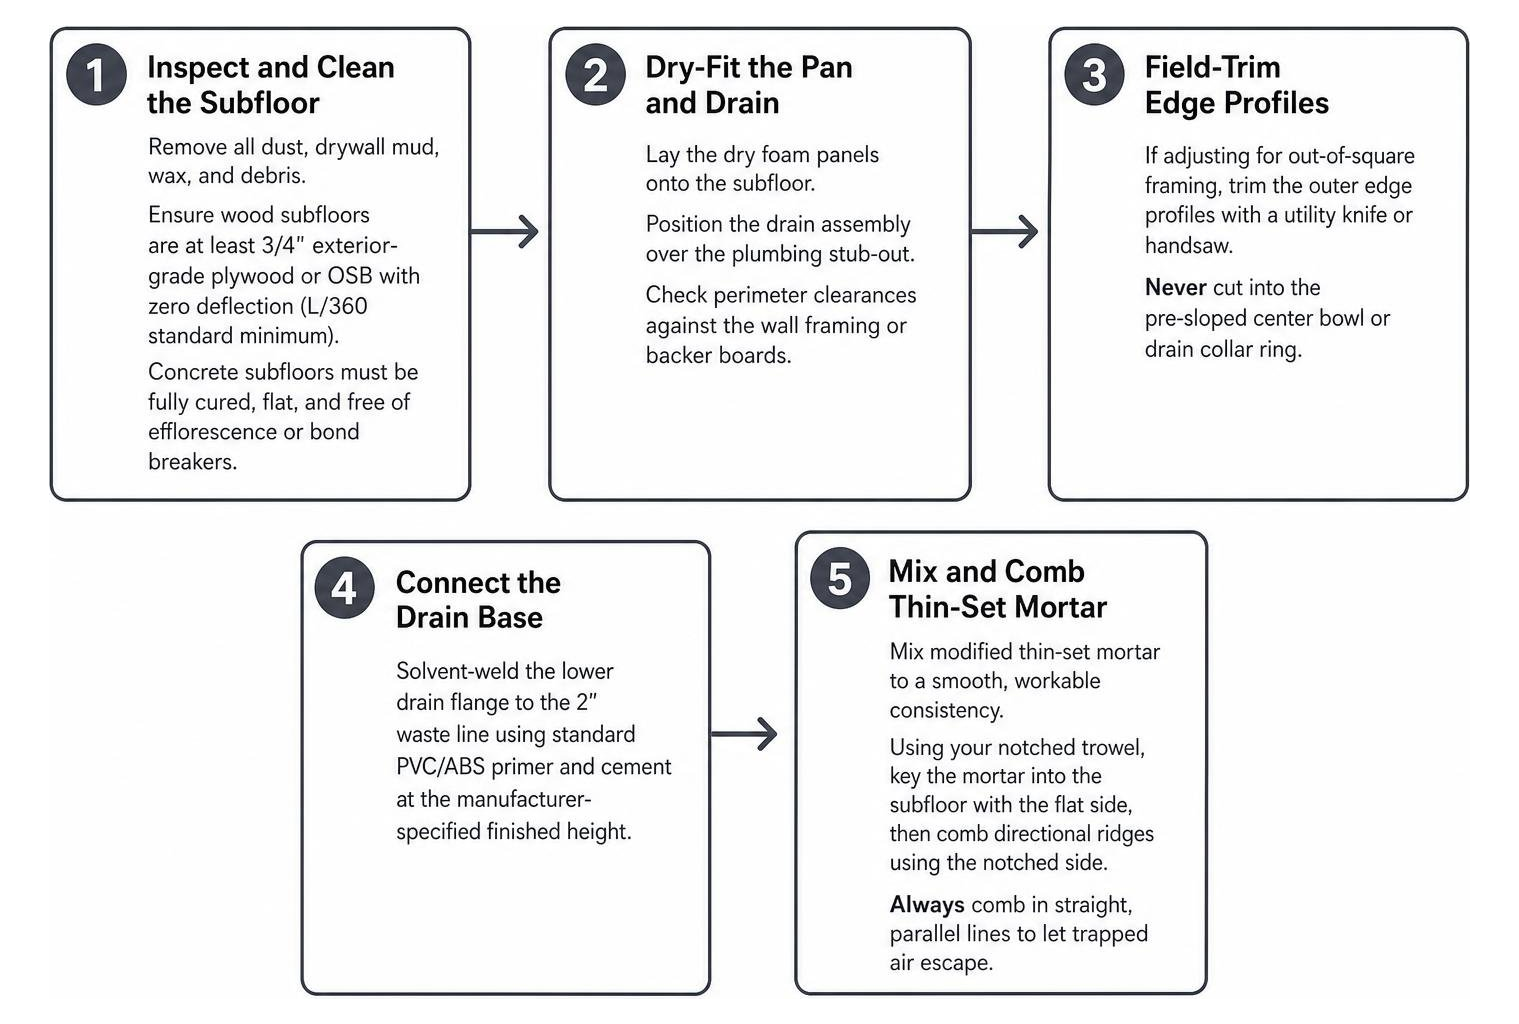
Inspect and Clean the Subfloor: Remove all dust, drywall mud, wax, and debris. Ensure wood subfloors are at least 3/4" exterior-grade plywood or OSB with zero deflection (L/360 standard minimum). Concrete subfloors must be fully cured, flat, and free of efflorescence or bond breakers.
Dry-Fit the Pan and Drain: Lay the dry foam panels onto the subfloor. Position the drain assembly over the plumbing stub-out. Check perimeter clearances against the wall framing or backer boards.
Field-Trim Edge Profiles: If adjusting for out-of-square framing, trim the outer edge profiles with a utility knife or handsaw. Never cut into the pre-sloped center bowl or drain collar ring.
Connect the Drain Base: Solvent-weld the lower drain flange to the 2" waste line using standard PVC/ABS primer and cement at the manufacturer-specified finished height.
Mix and Comb Thin-Set Mortar: Mix modified thin-set mortar to a smooth, workable consistency. Using your notched trowel, key the mortar into the subfloor with the flat side, then comb directional ridges using the notched side. Always comb in straight, parallel lines to let trapped air escape.
Set and Embed the Foam Pan: Lay the foam base into the wet mortar bed. Step across the entire surface using a scrap piece of plywood to distribute your weight, walking the foam firmly into the mortar ridges to achieve 100% continuous contact beneath the pan.
Check Pitch and Level: Place a spirit level along all four outer perimeter edges to ensure the top rim is completely level. Then place the level inside the pan along every directional plane to verify an uninterrupted 1/4" per foot drop to the drain.
Allow Proper Cure: Let the thin-set mortar cure undisturbed for 12 to 24 hours before walking directly on the surface or applying topical waterproofing.
Applying Waterproofing and Sealing Transitions
Even high-density closed-cell foam pans require a fully sealed topical waterproofing envelope to protect the pan joints, curb seams, and wall intersections.
Joint and Seam Sealing: Embed waterproof sealing bands across all foam-to-foam seams, curb junctions, and perimeter wall transitions using unmodified or modified thin-set mortar (per membrane manufacturer specifications) or approved polyurethane adhesive.
Membrane Application: Apply an ANSI A118.10 bonded sheet membrane or roll two continuous coats of liquid waterproofing across the entire pan, up the walls a minimum of 3 inches above the flood rim, and completely over the shower curb.
Perform a 24-Hour Flood Test: Plug the drain throat with an inflatable test plug. Fill the shower base with clean water up to the top of the curb (or at least 2 inches deep) and mark the water line with pencil. After 24 hours, confirm there has been zero water loss before setting your first tile.
Common Installation Pitfalls and How to Avoid Them
Even with precision-milled components, improper installation techniques can lead to failure. Keep these common mistakes in mind:
Uneven Subfloors and Inadequate Mortar Bedding
Setting a foam shower pan over an uneven, dipped, or un-leveled subfloor is a major cause of failure. If the subfloor has a 1/4" dip, the foam pan will bridge over that gap. Over time, foot traffic will flex the pan, snapping tile grout joints and breaking the waterproof seal.
The Fix: Always check the bare subfloor with a 6-foot straightedge before starting. Grind high spots on concrete or use a self-leveling underlayment to flatten dips. Never use "spot bonding" or dollops of thin-set under a foam pan; use a consistent, directional trowel pattern to achieve full 100% bed coverage.
Over-Trimming the Slope Profile
Every custom foam pan is manufactured with designated cut perimeters—typically up to 3 inches around the outer perimeter edges. Cutting too deep into the pan removes the designed slope profile, leaving a flat landing where water will collect permanently.
The Fix: Measure your total shower footprint carefully prior to ordering so that the factory cuts match your framing within 1/8" tolerance. If field trimming is required, remove material only from the outermost flat edges.
Clogging Drain Weep Holes and Flange Channels
On clamping-collar drain systems, sub-surface water that penetrates grout joints must escape into weep holes surrounding the drain body. Pushing thick mortar or sealant directly over these weep slots traps water inside the pan assembly.
The Fix: Install crushed tile spacers or a dedicated weep protector ring around the drain collar before packing setting mortar around the throat.
Frequently Asked Questions About Shower Pan Slope Kits
Can a custom shower pan slope kit be cut to fit out-of-square walls?
Yes. Custom foam slope kits are engineered with an outer perimeter cut zone (typically 2 to 3 inches wide) that allows field trimming with a standard utility knife or fine-tooth saw. This makes it easy to adjust the base for walls that are out of square without compromising the primary slope angle.
What is the typical cost of a custom foam shower slope kit?
A standard prefabricated foam slope kit ranges between $350 and $650, depending on size, drain configuration, and included accessories (curbs, seals, drain grates). Custom-fabricated, large-format, or complex neo-angle kits generally range between $700 and $1,200. While the upfront material cost is higher than a bag of dry-pack mortar sand, the system saves $400 to $800 in specialized labor and cuts days off installation timelines.
Do custom slope kits require special tile or thin-set mortar?
Most high-density foam slope kits require a polymer-modified thin-set mortar meeting ANSI A118.4 or ANSI A118.15 to bond the foam to the subfloor. For tile installation, you can set almost any ceramic, porcelain, or natural stone tile. If setting small mosaics (under 2" x 2"), verify that your base meets compressive strength standards (such as 145 PSI) to distribute point loads evenly across the floor.
Conclusion
Getting a consistent, code-compliant shower floor pitch no longer requires hours of manual mortar troweling or trial-and-error screeding. By using a precision-engineered custom shower pan slope kit, you ensure a solid sub-tile foundation with an exact 1/4-inch per foot drop straight to the drain.
At Shower Concepts, our team builds high-performance, 100% virgin-foam shower pans made to order with rapid turnaround out of our Denver, Colorado manufacturing facility. Whether you are dealing with awkward drain offsets or planning a sleek barrier-free remodel, pairing your custom-sloped base with an integrated point drain kit gives you a dependable, fast-draining, and long-lasting shower installation. Plan your layout, prep your subfloor thoroughly, and install your custom slope kit with complete confidence.
