A Practical Guide to Hidden Shower Drains for a Seamless Look
Understanding the Mechanics and Types of a Hidden Shower Drain
Understanding How a Hidden Shower Drain Works
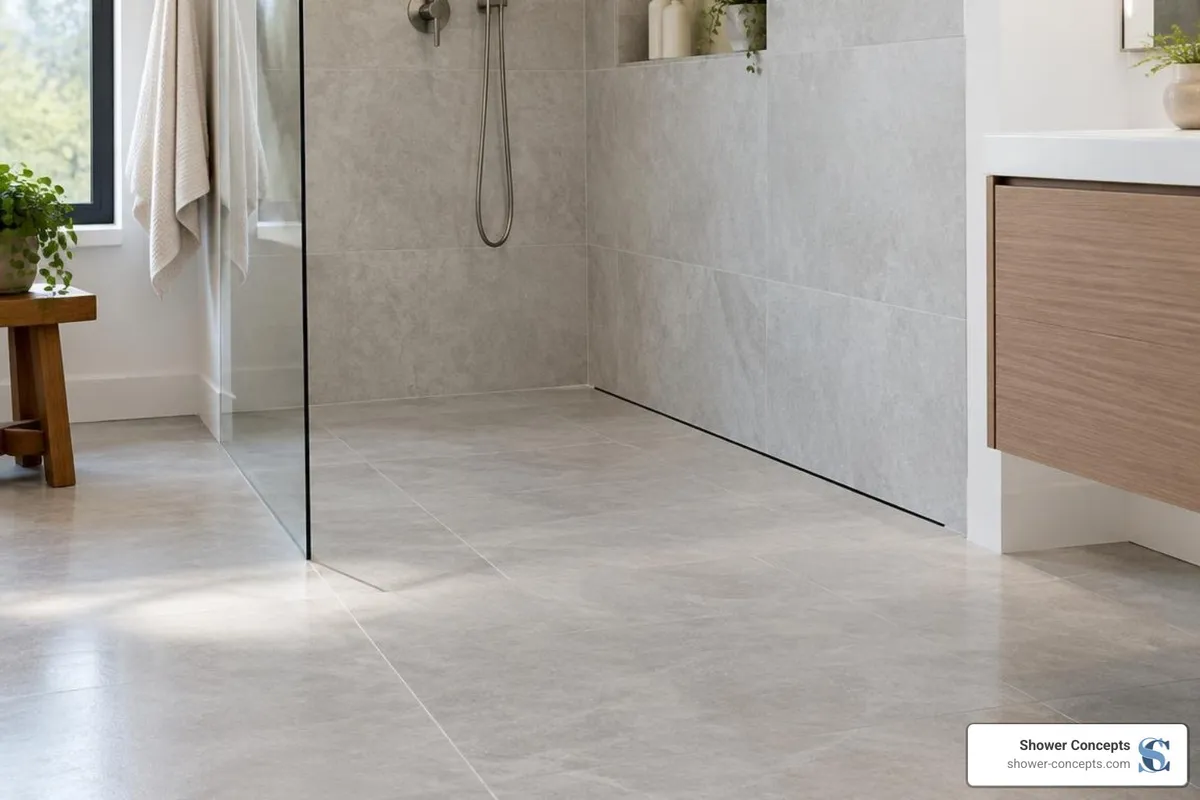
Traditional shower construction has long relied on center-placed, perforated metal grates. While functional, standard point drains break up the visual plane of your tile and dictate a complex four-way funnel slope. A concealed system changes the entire dynamic of water evacuation.
Instead of water dumping through open surface perforations, it flows into a narrow perimeter shadow gap (typically 1/8 to 1/4 inch wide) that outlines a removable tileable cover plate. Water slips over the edge of the floor tile, drops into an underlying gravity drainage box (detailed in shower floor drain patent designs), and enters the standard residential 2-inch waste line.
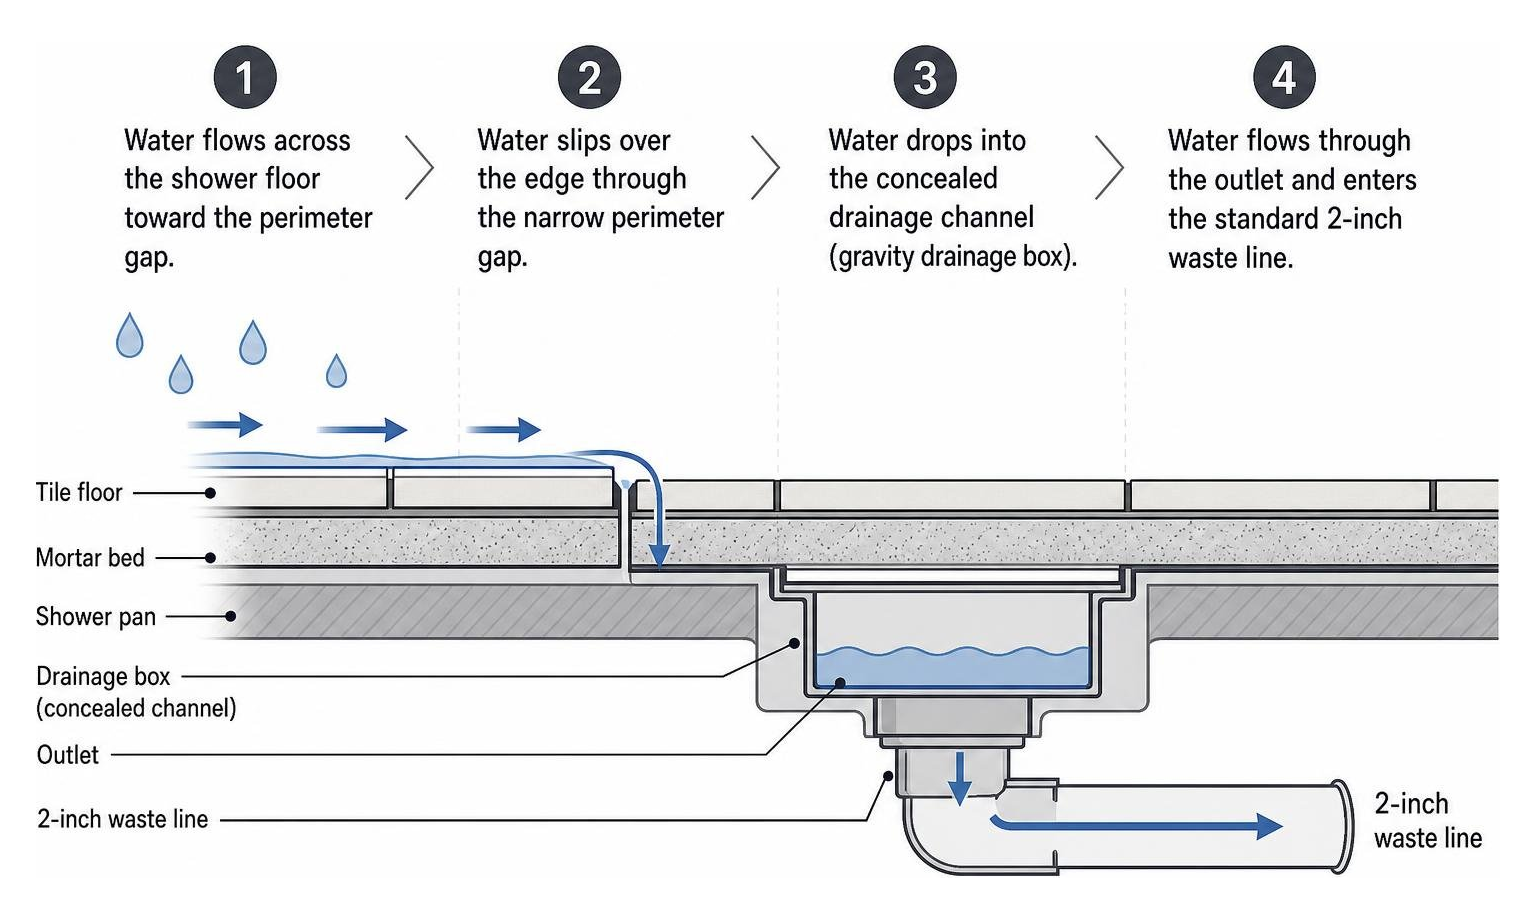
Engineering a reliable concealed assembly requires strict structural stability. Modern assemblies integrate rigid subfloor flange anchoring and recessed internal support posts. These posts feature specialized guide tabs that support the heavy tile insert from beneath. This prevents the tile panel from rocking, tilting, or cracking under direct foot traffic while keeping the drainage pathway open.
Main Concealed Drain Configurations
Concealed drainage hardware comes in several physical geometries to match specific architectural layouts:
Tile-Over Linear Channels: Long, slender channels positioned against a wall, across the threshold, or down the center of the stall. The matching floor tile is set directly inside a stainless steel tray insert, leaving only a subtle perimeter shadow line.
Tile-In Square Point Drains: A compact square format (commonly 4x4, 6x6, or 8x8 inches) where a single matching tile sits inside a recessed square frame. Water escapes along the four outer edges.
Wall-to-Floor Concealed Assemblies: Specialized units that mount flush against the bottom plate of the wall studs, allowing water to escape into an inconspicuous horizontal floor slit or baseboard gap.
Engineered Architectural Systems: Architectural manufacturers offer specialized site-sizable configurations that allow installers to tailor channel lengths and outlet placements to non-standard shower footprints.
Advantages of Concealed Tile-In Drainage Systems
Design Flexibility and Large-Format Tile Compatibility
The most immediate benefit of choosing a concealed linear drainage system is how it transforms your flooring options. Traditional center drains require a "compound funnel" slope, pitching the floor from all four corners down to the center. This geometry forces tile setters to use small mosaic tiles (no larger than 4x4 inches) or make diagonal "envelope relief cuts" across larger tiles, cluttering the floor with grout joints.
A hidden linear drain requires only a single-slope plane (a uni-directional pitch) toward the channel. Because the floor slopes along one flat plane, you can install large-format porcelain slabs—such as 12x24, 24x48, or even massive gauged porcelain panels—without relief cuts. This creates clean aesthetic continuity where the vein patterns of your tile flow uninterrupted from the dry bathroom floor right through the shower stall.
Barrier-Free Access and Curbless Safety
Curbless walk-in showers and zero-threshold transitions have moved from niche accessible builds to the gold standard of modern residential architecture. Beyond high-end aesthetics, eliminating the traditional 4-to-6-inch shower curb removes a major trip hazard and ensures full ADA compliance for aging-in-place designs.
A linear concealed drain placed against the back wall or right at the entry threshold prevents water from escaping into the dry zone without requiring a raised curb.
Comparison of Shower Drain Formats
To help determine which layout fits your remodel, here is how concealed systems compare directly to traditional drains:
Drain Feature | Hidden Linear Drain | Tile-In Square Point Drain | Traditional Center Point Drain |
|---|---|---|---|
Aesthetic Impact | Near-invisible perimeter gap | Subtle square shadow line | Visible metal surface grate |
Tile Compatibility | Large-format (unlimited sizes) | Small mosaics or envelope cuts | Small mosaics (under 4"x4") |
Slope Required | Single uni-directional slope | Four-way compound funnel | Four-way compound funnel |
Flow Rate (2" outlet) | 6.3 to 9.5+ GPM | ~7.0 to 9.0 GPM | ~6.0 to 9.0 GPM |
Hardware Price Range | $350 – $1,800+ | $150 – $700 | $40 – $120 |
Curbless Suitability | High (ideal across threshold/wall) | Moderate (requires floor recess) | Low (difficult entry transition) |
Technical Specifications: Slope, Sizing, and Flow Rates
Flow Rate and Waste Line Sizing Requirements
A concealed drainage opening must match the output of your plumbing fixtures. A standard residential 2-inch waste pipe safely drains approximately 9 gallons per minute (GPM).
Drain position along the shower floor impacts this capacity. A linear hidden drain installed directly at the shower entrance may deliver around 6.3 GPM, while the same channel installed flush against the rear wall can reach 9.5 GPM due to water head pressure.
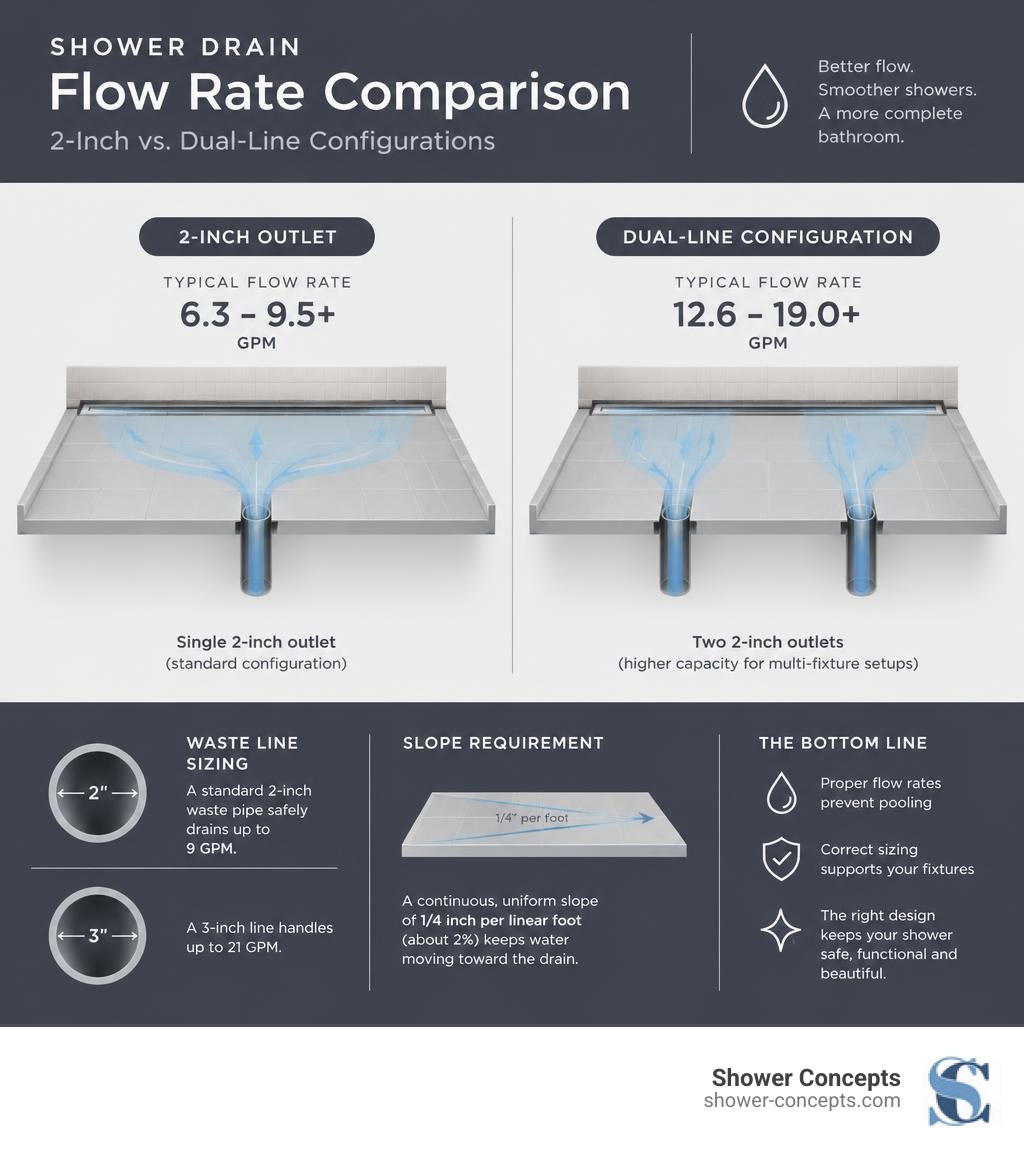
If you are installing luxury spa showers with multiple body sprays, dual high-flow showerheads, or rain heads delivering over 10 GPM, plan for dual 2-inch outlets or step up to a 3-inch waste line. A 3-inch line can handle high-flow volumes of up to 21 GPM without pooling.
Slope Calculations and Pan Support Strength
Water must move steadily toward the drainage gap without pooling. Linear drainage channels require a continuous, uniform slope of 1/4 inch per linear foot (a roughly 2% grade).
To maintain this precise pitch without hand-screeding heavy, inconsistent mud beds on site, many professional installers turn to custom, pre-sloped virgin foam pans. In our step-by-step breakdown on foam shower pan installation, we show how high-density expanded foam substrates provide structural stability while locking in factory-calibrated drainage slopes.
Look for high-performance foam bases with a compressive strength rating near 290 psi. This provides a rigid substrate that easily supports the weight of large-format glass enclosures, stone slabs, and daily point loads without deflection or cracking along the perimeter drainage gap.
Installation and Waterproofing Integration
Subfloor Preparation and Structural Anchoring
A successful concealed drain installation begins down at the framing stage. Because a tileable drain cover must align flush with the surrounding floor tile, there is zero tolerance for subfloor sagging or out-of-level joists.
Check Subfloor Deflection: Ensure subfloor joists meet maximum L/360 or L/720 deflection criteria (depending on ceramic vs. natural stone installation).
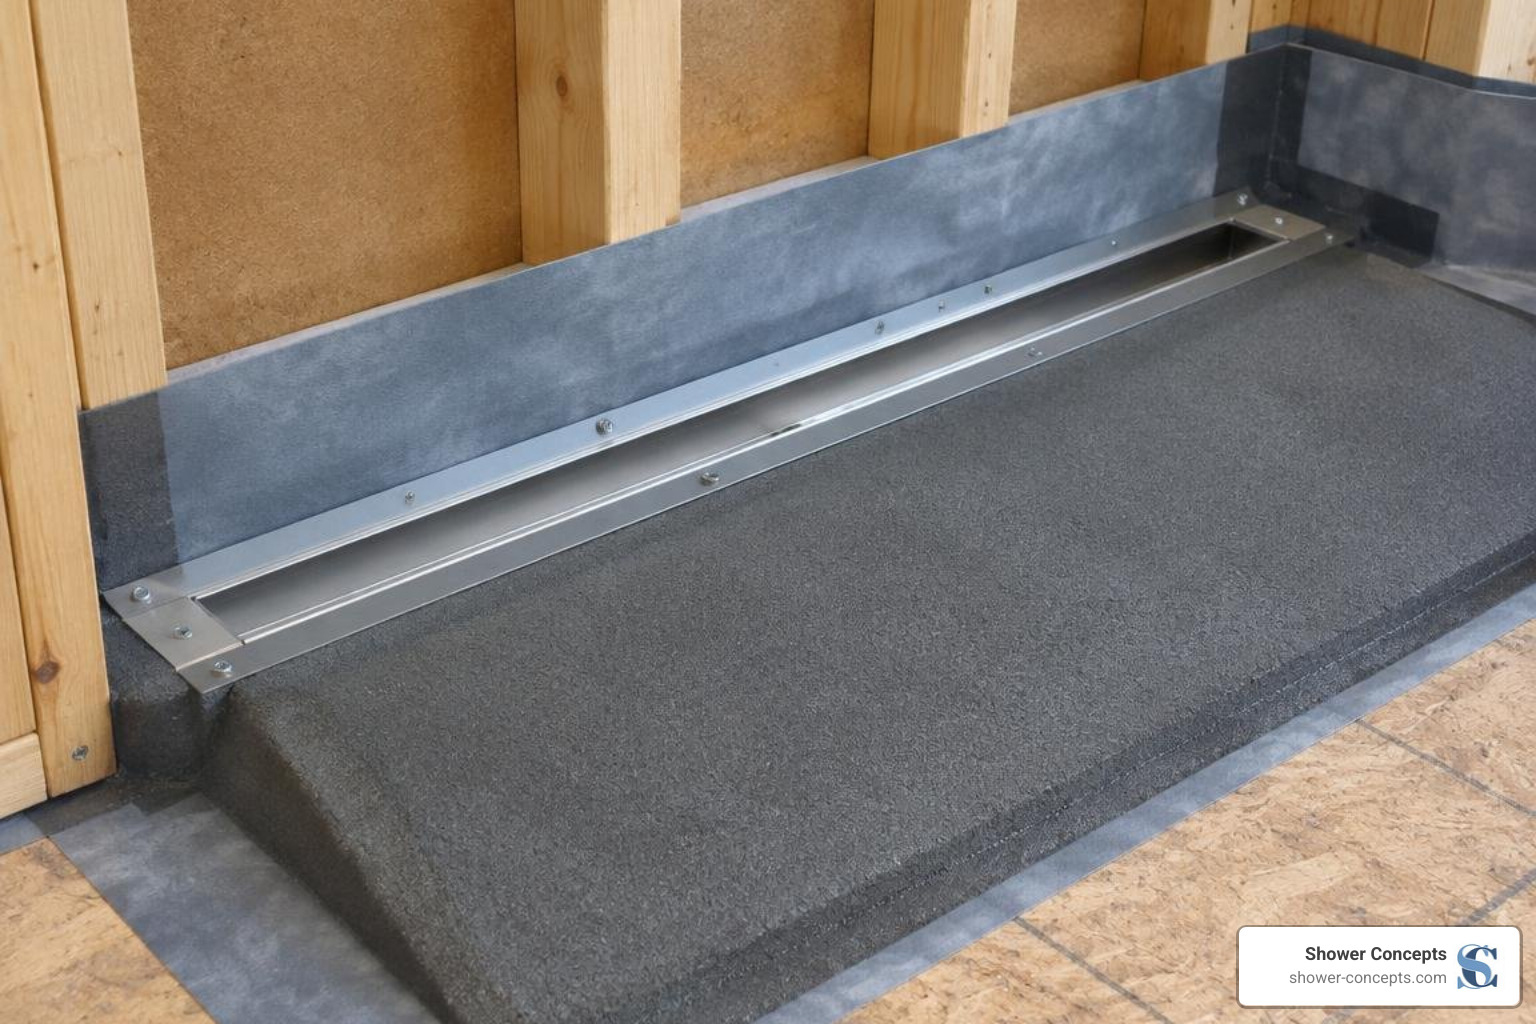
Anchor the Drain Flange: Secure the drain channel's vertical flange directly to the wall framing studs using non-corrosive screws, and fasten the horizontal deck flat to the subfloor.
Embed the Pan: Place custom pre-pitched shower pans ready for tile into a fresh, combed bed of modified thinset mortar to eliminate voids underneath.
Waterproofing Membranes and Flange Sealing
A concealed drain directs water into an internal trough, making complete waterproofing integration critical. The drain assembly must form a continuous, monolithic seal with your shower pan's waterproofing layer.
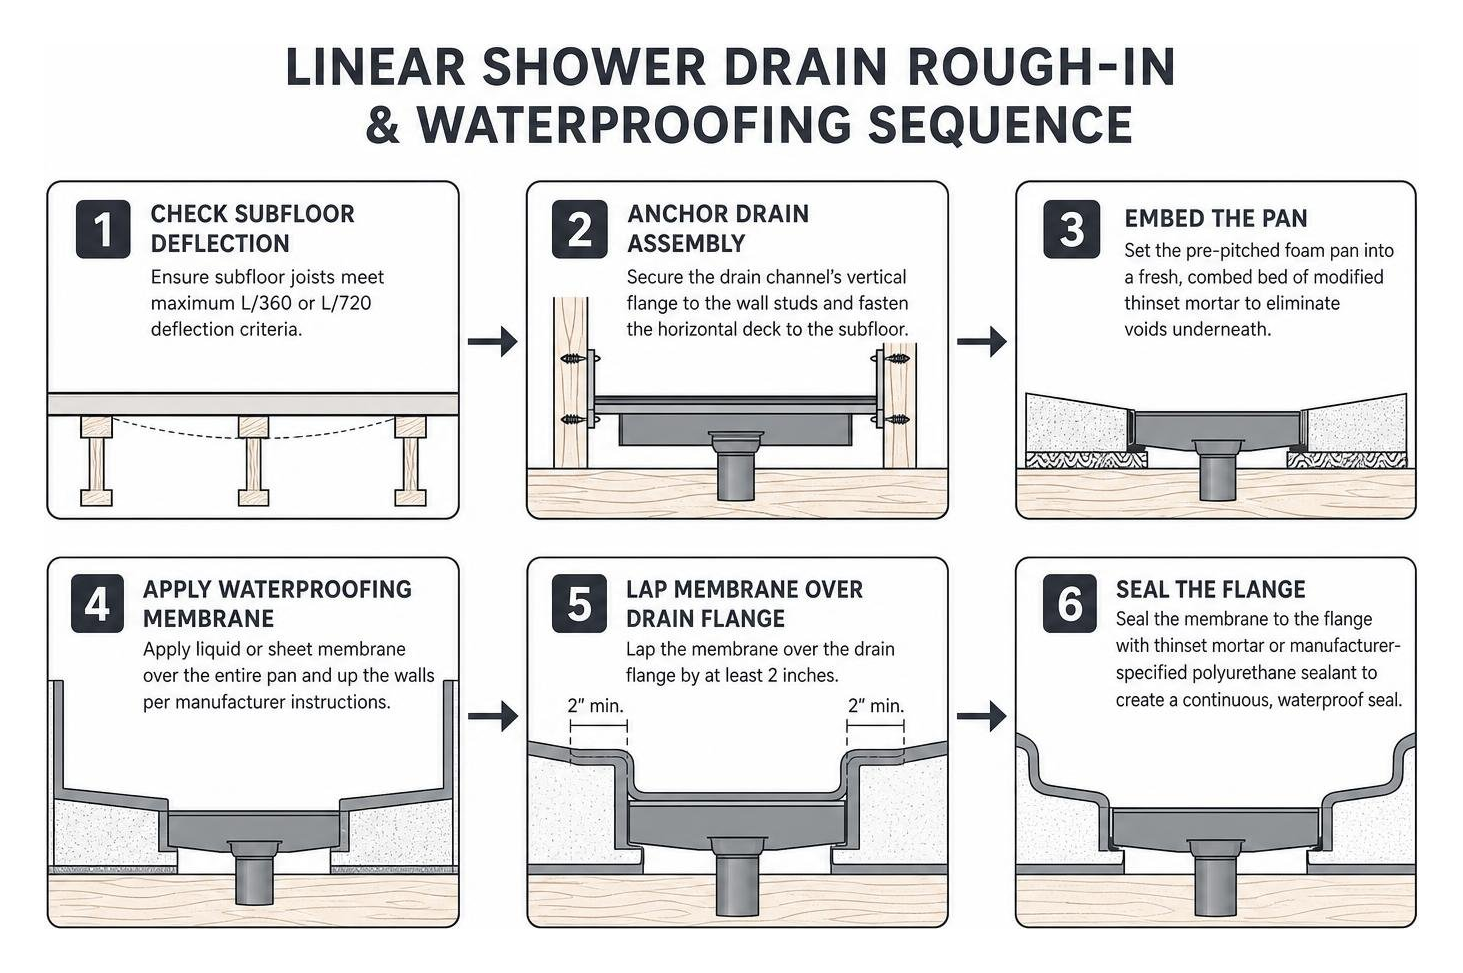
Our linear shower drain installation diagram details how modern bonding flanges connect to liquid-applied waterproofing membranes, bonded sheet membranes, or traditional clamping collar systems. Ensure the waterproofing membrane laps over the integrated channel flange by at least 2 inches, sealing it with thinset mortar or manufacturer-specified polyurethane sealant to prevent moisture from finding its way beneath the pan.
Maintenance, Cleaning, and Common Limitations
How to Clean and Maintain a Hidden Shower Drain
A frequent concern among homeowners is how to service a drain that has no visible screws or grates. Modern concealed drain systems are designed for simple, tool-free access.
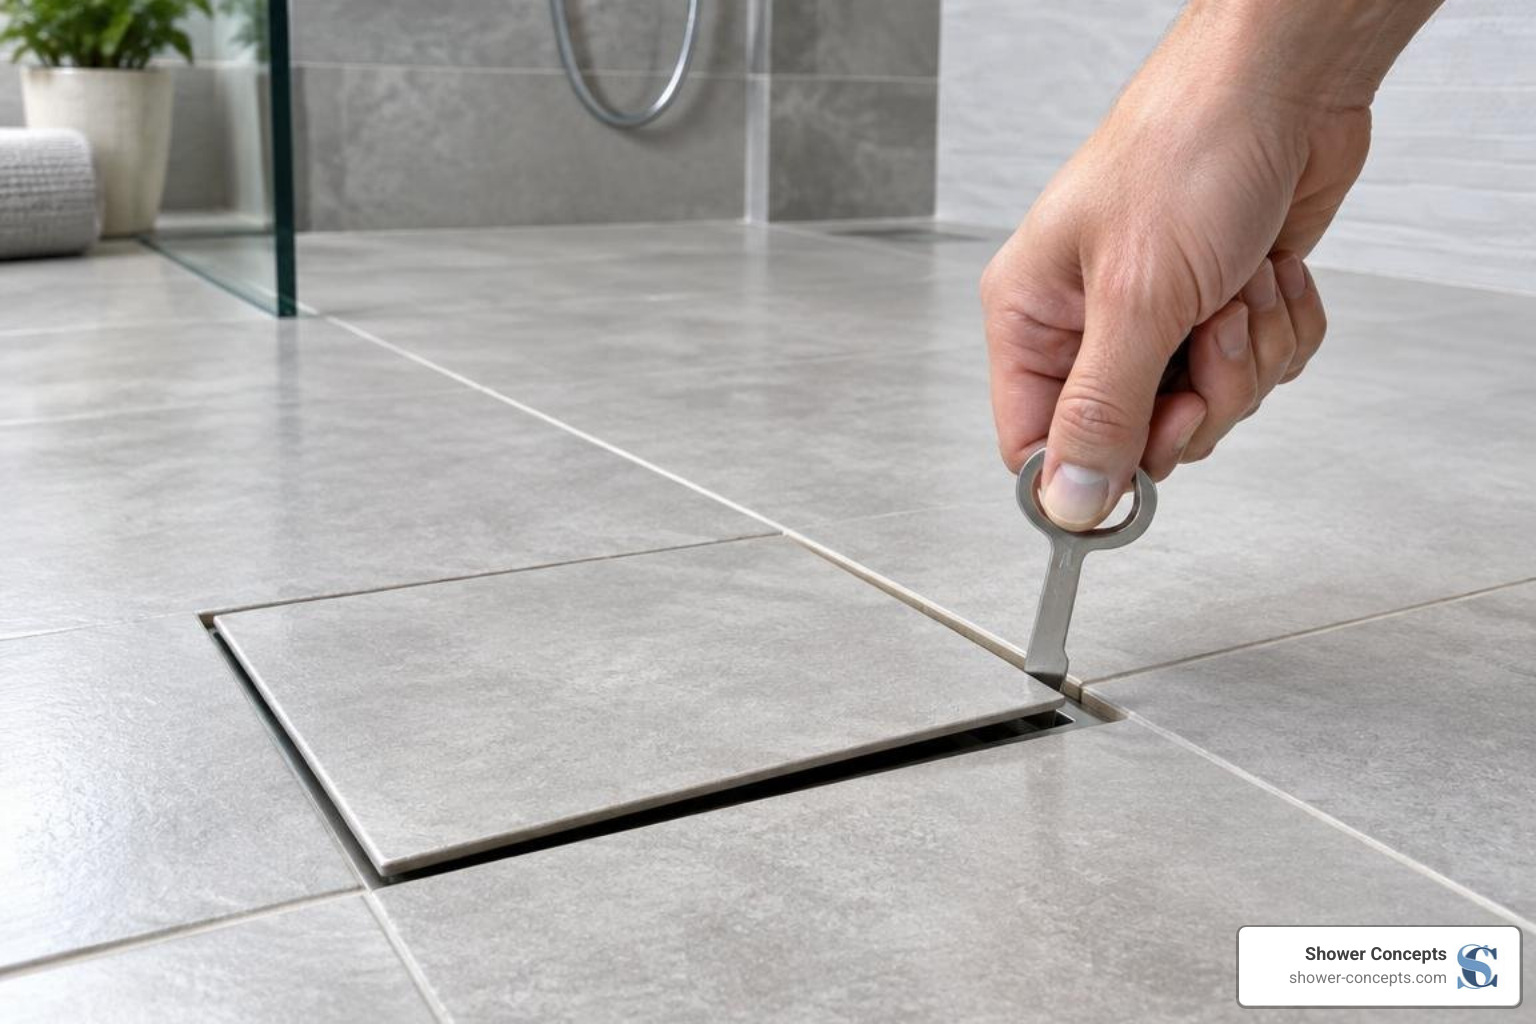
Using the Lifting Key: Every quality tile-in drain kit includes a small metal lifting key or hook tool. Insert this key into the perimeter shadow gap, turn it 90 degrees under the cover tray lip, and lift the tile-filled insert out of the channel.
Emptying the Hair Strainer: Beneath the tile panel sits a removable stainless steel or composite hair strainer basket. Empty this basket every 2 to 4 weeks to keep soap residue and hair from restricting flow into the P-trap.
Septic-Safe Mechanical Filtration: Utilizing an integrated mechanical trap eliminates the need for harsh, corrosive chemical drain openers that can damage plumbing lines and disrupt household septic systems.
Rinsing the Channel: Flush the internal stainless steel or polyurethane trough with warm water and mild dish soap, wipe away any residual sediment, and set the tile cover back onto its internal support shoulders.
Potential Drawbacks and Considerations
While concealed drains offer clean visual lines, you should weigh a few practical considerations during planning:
Strict Installation Tolerances: The tile insert must sit parallel and flush with the surrounding floor. If the tile on the cover plate is set even 1/16 inch too high or too low, it creates an uneven lip.
Perimeter Gap Maintenance: Because hair and debris enter through the 1/8-to-1/4-inch outer perimeter gap, neglected hair buildup can reduce water flow faster than on a broad, open grate.
Upfront Cost: Concealed tile-in assemblies cost more in materials and precision labor than off-the-shelf round metal drains.
Frequently Asked Questions about Concealed Shower Drains
How does water drain through a hidden shower drain without a visible grate?
Water flows across the continuous slope of the shower floor and drops into a 1/8-to-1/4-inch perimeter shadow slot surrounding the tile-covered insert. Gravity directs the water down into an underlying sealed drainage trough, which funnels directly into the 2-inch plumbing waste pipe.
Can you use large-format tiles with a hidden shower drain?
Yes. Because linear concealed drains rely on a single, uni-directional slope rather than a four-way funnel pitch, you can install large-format tiles (such as 12x24 or 24x48 inches) without making diagonal envelope relief cuts.
How much does a hidden shower drain system cost?
Concealed drain hardware ranges from $150 to $700 for square tile-in assemblies, and $350 to $1,800 for high-end linear systems or integrated pre-waterproofed pans. Total installation labor is generally higher than traditional center drains due to the precise subfloor framing, waterproofing integration, and tile mitering required.
Conclusion
A concealed shower drain eliminates bulky metal grates and opens up new possibilities for clean, barrier-free bathroom layouts. By pairing single-plane slopes with seamless tile inserts, these systems deliver practical accessibility and uninterrupted design.
At Shower Concepts, we manufacture lightweight, custom-sloped shower pans from 100% virgin high-density foam at our Denver, Colorado facility. We help builders and tile setters streamline installations with quick turnarounds and precise, durable layouts. Whether you are building a full zero-threshold linear shower or retrofitting a compact space with our rapid recess point drain kit, proper structural support and calibrated slopes ensure a reliable, watertight installation.
