Unscrewing the Stubborn: How to Get That Drain Flange Out
How to Remove a Shower Drain Flange Without Damaging the Pan
Remove the drain cover first, then check how the flange connects to the pipe and shower pan. If it is threaded, fit a drain wrench into its grooves or crossbars and turn it counterclockwise with steady pressure. If it has a compression gasket, remove the retaining nut and gasket before working on the drain body. A glued or clamped drain will not simply unscrew; it may need access from below or careful cutting.
Stop if the pipe turns or the pan flexes. Forcing the flange can turn a drain replacement into a pan or pipe repair. Learning how to remove a shower drain flange safely comes down to matching your technique to the connection type before you apply any real force.
I'm David Stewart, an owner and partner at Shower Concepts with more than 15 years of experience in construction and tile installation. I've helped tile installers work through questions like how to remove shower drain flange assemblies while protecting the pan and drain connection.
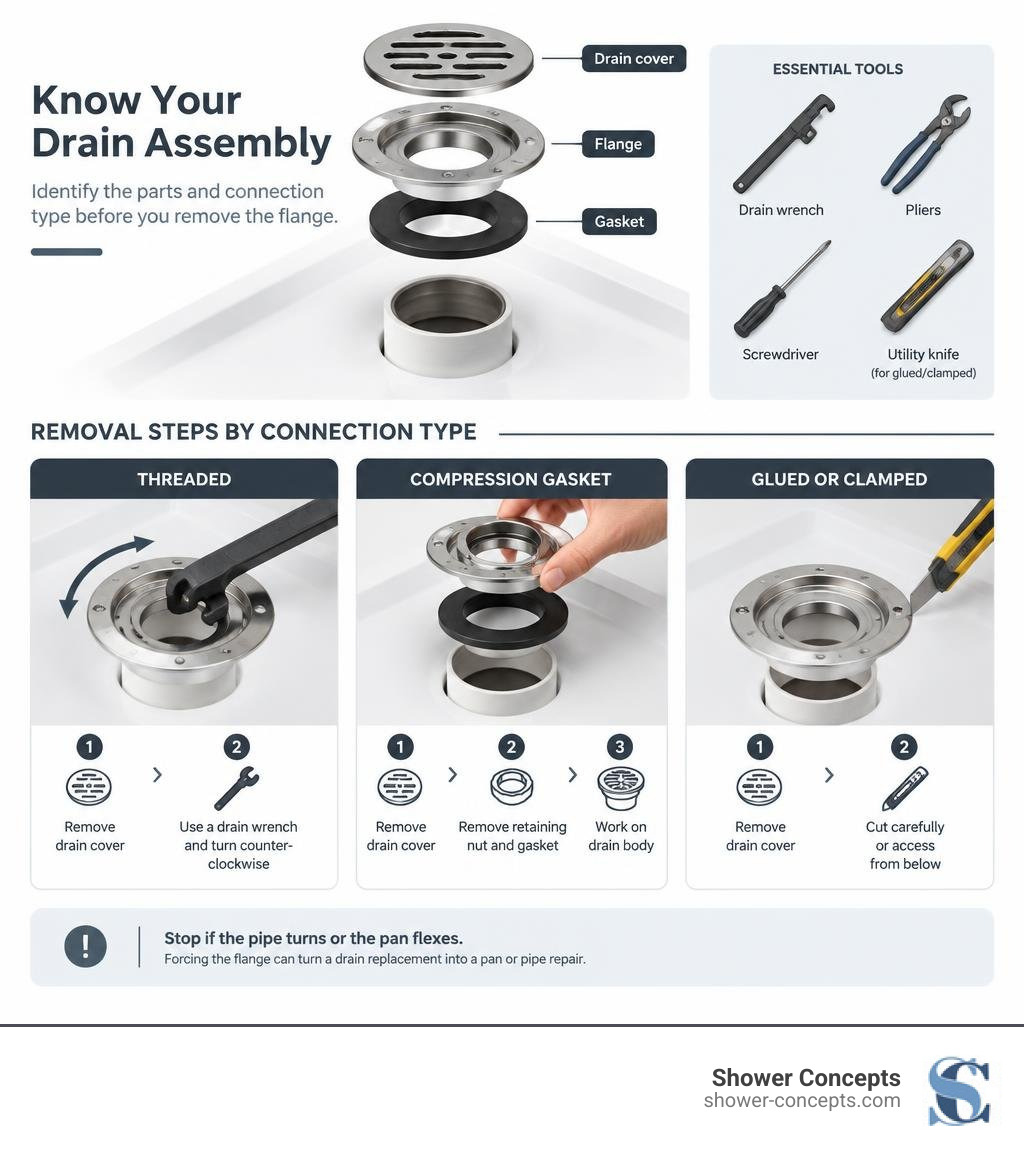
Identifying Drain Types and Essential Tools Before Removal
Before grabbing the largest wrench in your toolbox and applying full force, take a breath. Shower drain assemblies are not universal. Trying to unscrew a drain flange that has been solvent-welded directly to the plumbing will instantly crack your shower base or fracture the waste pipe below.
Understanding the anatomy of your drain fixture is the key to an efficient extraction. A standard residential shower drain connects to a 2-inch PVC or ABS waste pipe (or older cast iron and brass). Between the drain body and the shower receptor sits a combination of friction washers, rubber gaskets, and plumber’s putty or silicone sealant.
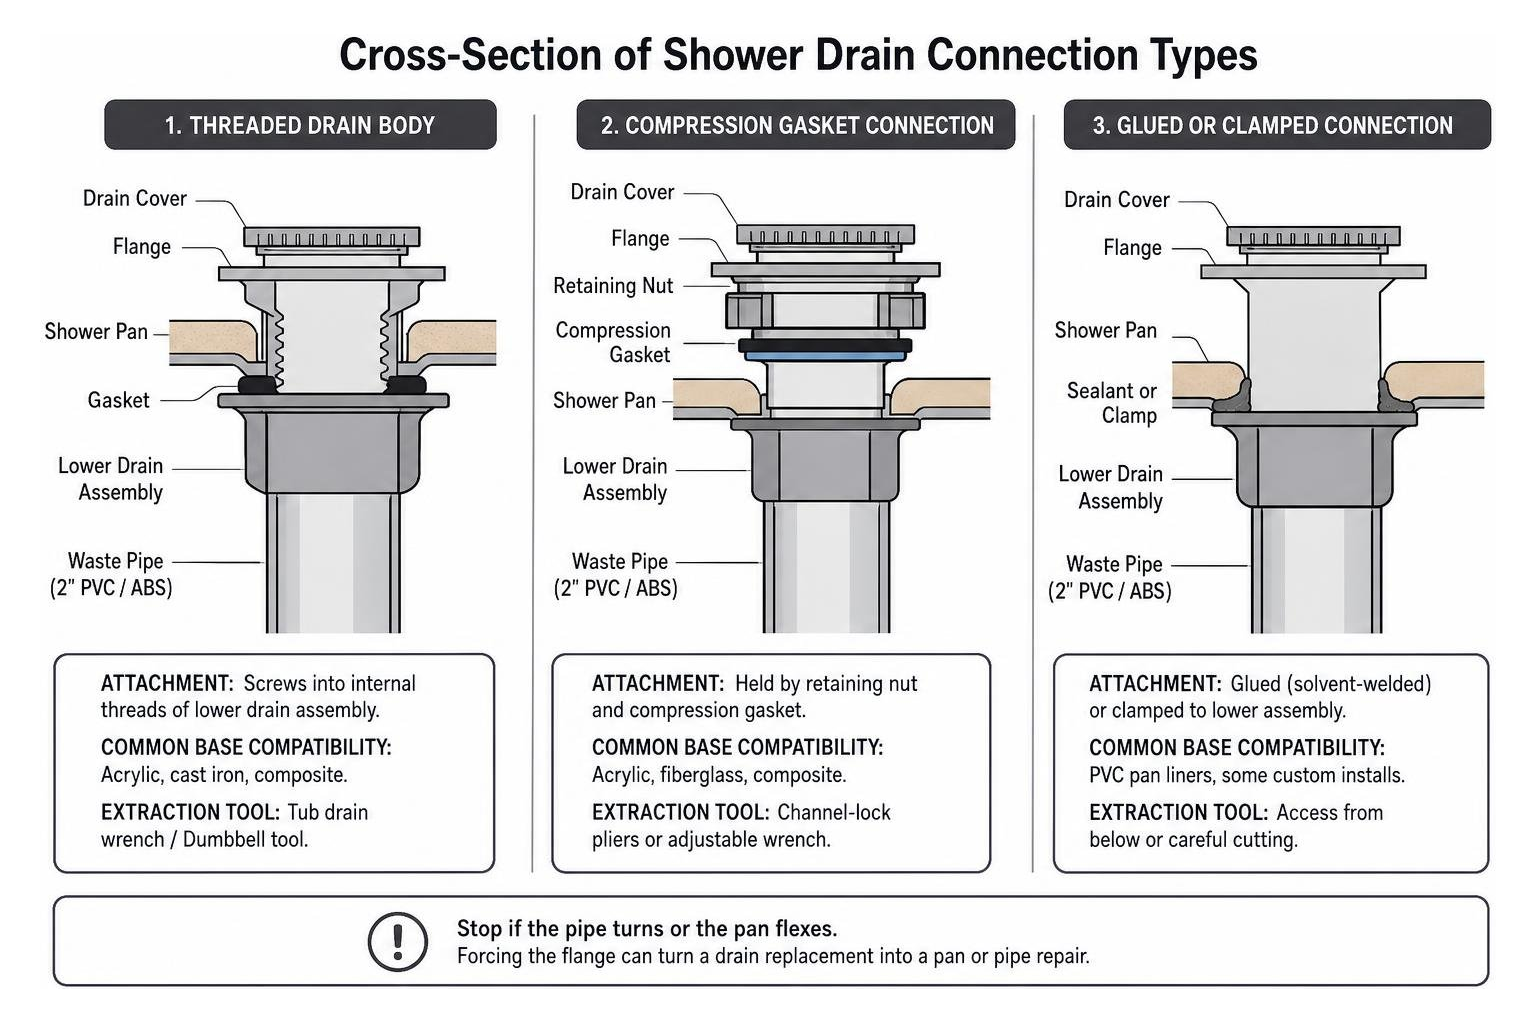
Here is a quick breakdown of common drain styles and how they are secured:
Drain Flange Type | Typical Attachment Method | Common Base Compatibility | Primary Extraction Tool Needed |
|---|---|---|---|
Threaded Drain Body | Screws into internal threads of lower drain assembly | Acrylic, cast iron, composite | Tub drain wrench / Dumbbell tool |
No-Caulk / Compression | Internal rubber donut compressed around 2" pipe via locking nut | Fiberglass, preformed pans | Needle-nose pliers / Internal socket tool |
3-Piece Clamping Ring | Bolted through pan liner to subfloor drain body | Traditional mortar bed tile showers | Socket wrench / Hex key |
Solvent-Welded (Glued) | Chemically bonded directly to 2" ABS/PVC riser | Custom pans, plastic receptors | Mini hacksaw / Internal pipe cutter |
Essential Tools for Drain Extraction
Gathering the proper specialty tools ahead of time prevents stripped crossbars, scratched finishes, and unnecessary frustration. You will need:
Dumbbell Wrench (Drain Key): A dual-ended wrench designed to drop into the crosshairs of standard threaded drain bodies.
Internal Pipe Wrench / Extraction Tool: A reverse-cam or expanding-jaw tool that grips smooth, rounded metal from the inside when crossbars are broken.
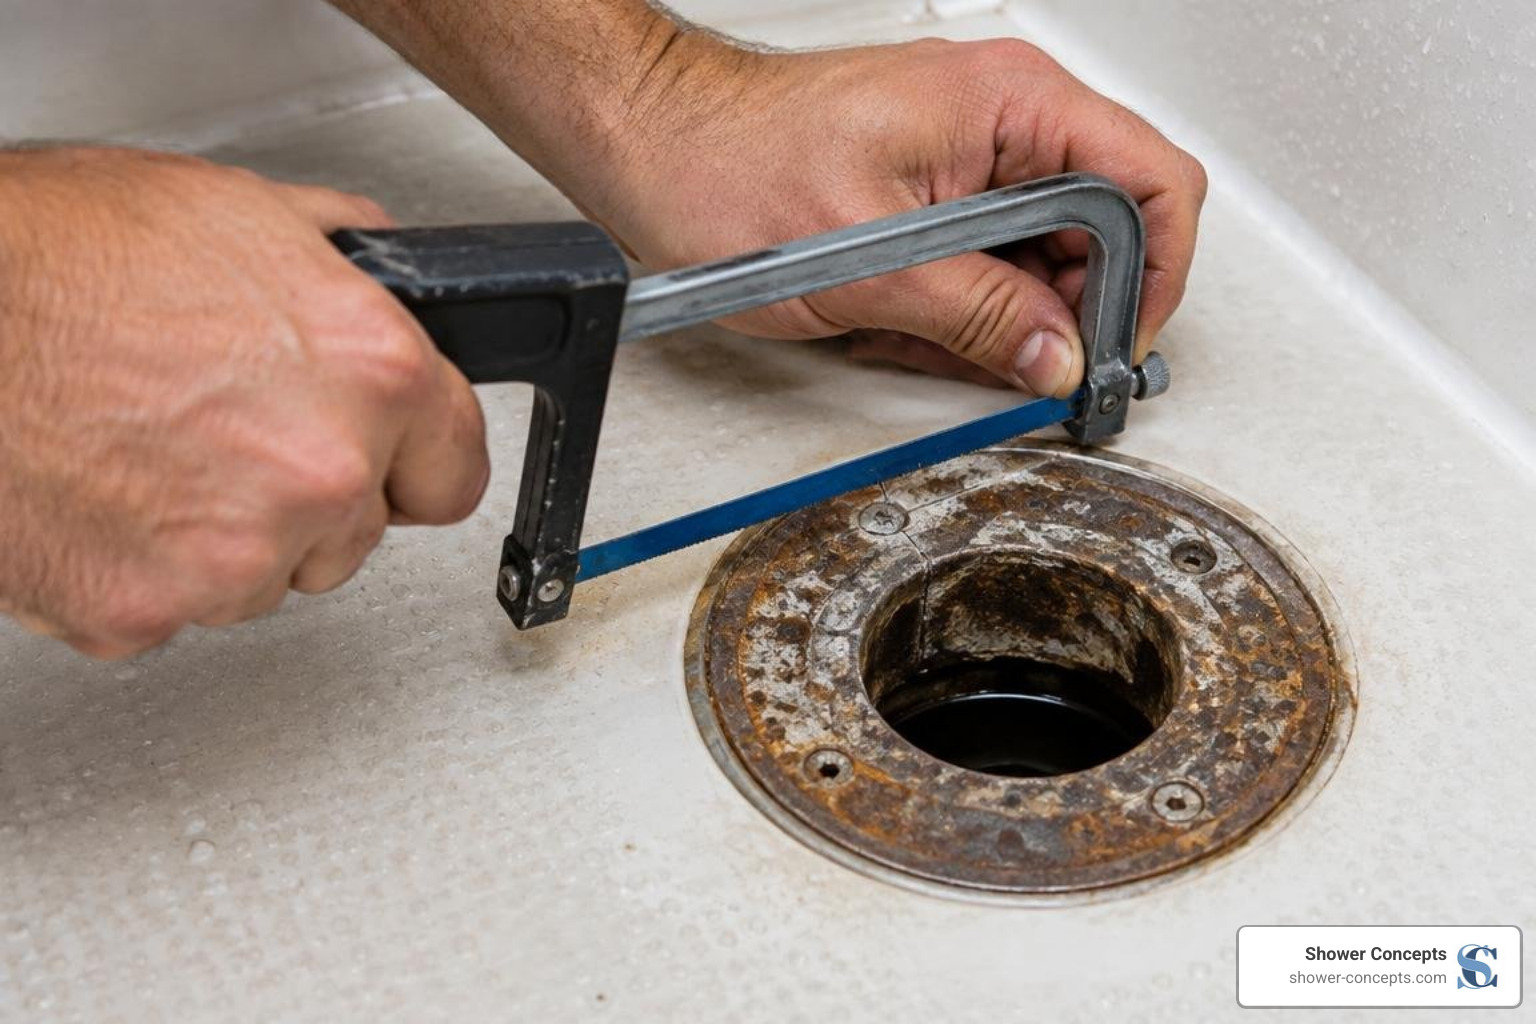
Mini Hacksaw or Multi-Tool: Essential for making precision relief cuts without damaging the shower base floor.
Needle-Nose Pliers & Locking Pliers (Vise-Grips): For unthreading crown nuts, extracting split rings, and grabbing sliced flange fragments.
Flathead Screwdriver & Putty Knife: For gentle prying and scraping away dried sealants.
Penetrating Lubricant & Heat Gun (or Hair Dryer): To break chemical bonds and soften stubborn, rock-hard plumber's putty.
Safety Glasses & Heavy Work Gloves: Metal shards and brittle aged plastics can snap under tension.
How to Identify Your Shower Drain Assembly
Look straight down the throat of the drain with a flashlight after pulling the strainer.
Do you see crossbars and thread lines along the outer rim? You have a standard threaded flange.
Do you see a visible rubber sleeve surrounding the 2-inch pipe with a notched brass or plastic crown nut? You have a compression gasket assembly (often found in preformed bases).
Do you see three to four heavy hex bolts anchoring a wide clamping collar through a waterproof membrane? You are looking at a classic three-piece assembly, typical when installing a shower drain for tiled floor systems.
Do you have a seamless, integrated receptor without visible mechanical fasteners? You might be dealing with a modern hidden shower drain or a glued solvent-weld connection requiring internal relief cuts.
Step-by-Step Guide on How to Remove Shower Drain Flange Assemblies
Once you have identified the connection type, you can proceed methodically. If you are replacing a standard fixture with a modern preformed kit, this guide to replacing or installing a preformed shower drain can help you visualize the new assembly while disassembling the old one.
Preparing the Drain and Removing the Cover
Protect the pan finish: Lay down a heavy towel or thick cardboard around the work area to catch dropped tools and prevent accidental gouges.
Extract the grate: If the cover is secured with screws, remove them with a small Phillips or flathead screwdriver. If it is snap-in or screwless, hook the grate using a drain key, wire coat hanger, or needle-nose pliers and pull upward. For mobile home units or specialty pans, you can learn how to remove shower drain cover in mobile home setups without cracking thin surrounds.
Clear out debris: Remove any hair blockages and soap scum from the drain throat using needle-nose pliers. Thoroughly wipe the interior clean with a rag.
Block the pipe: Stuff a clean rag into the 2-inch waste pipe opening just below the work zone. This catches loose screws, metal filings, and hardened putty flakes before they can drop into your P-trap and cause a major clog.
How to Remove a Shower Drain Flange with Intact Cross Members
If your drain crossbars are solid and unbroken, standard mechanical torque is your best approach:
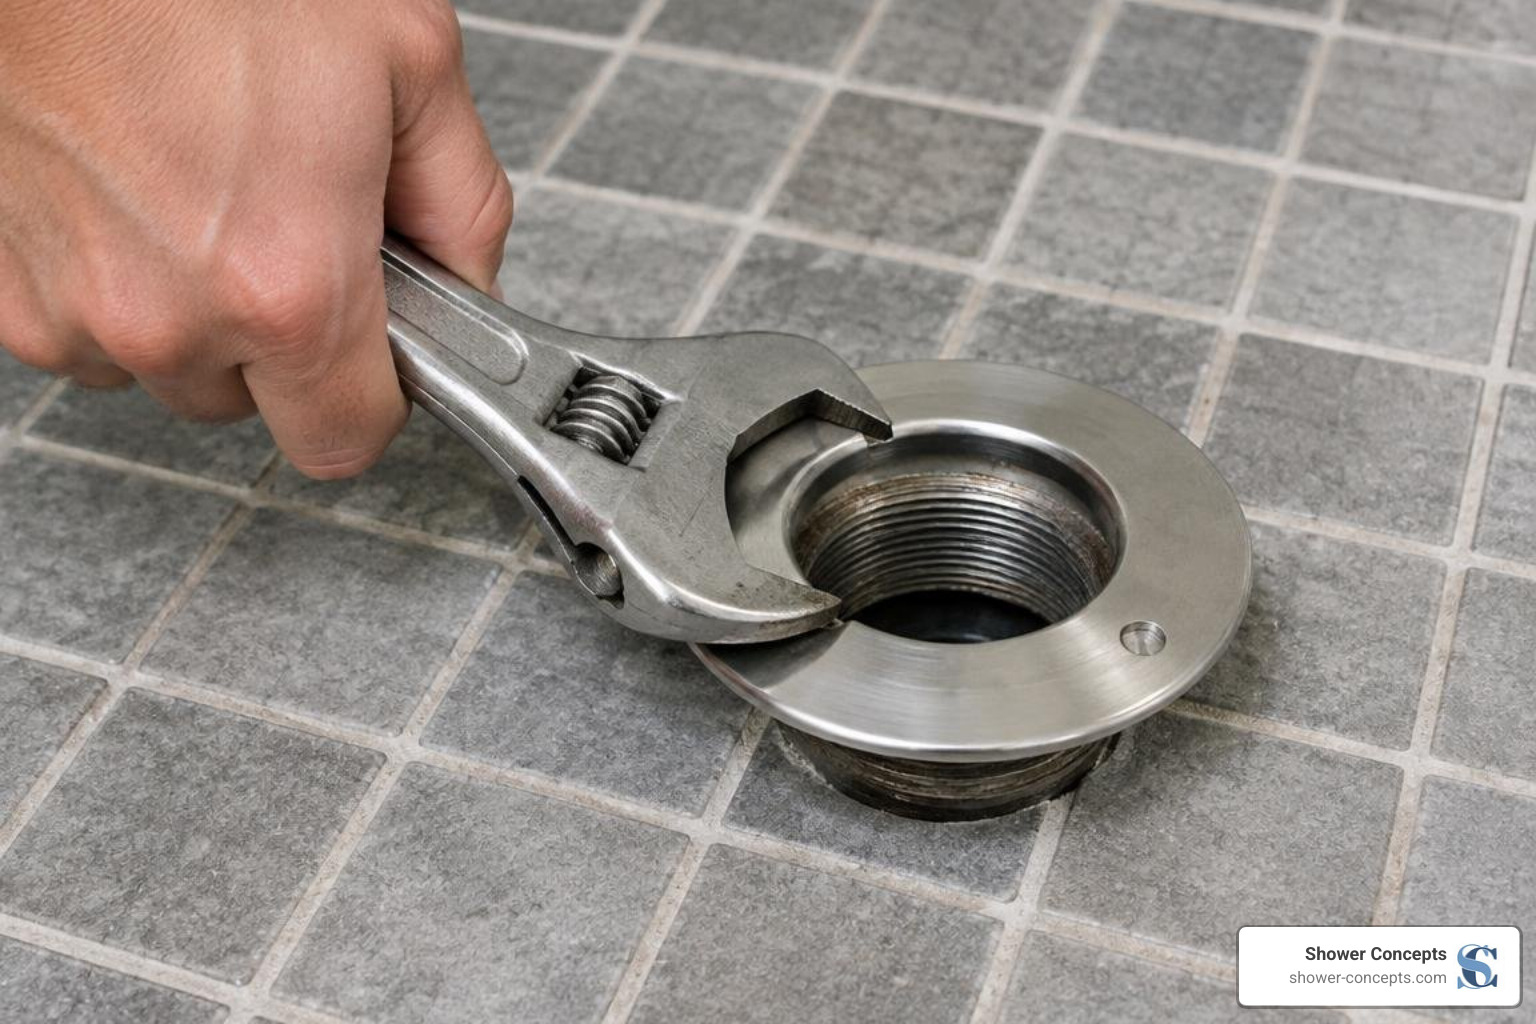
Engage the crossbars: Insert your dumbbell wrench or drain key into the drain throat until it seats firmly across the bottom crossbars.
Apply leverage: Slide an adjustable wrench or heavy screwdriver through the top of the dumbbell wrench to create a T-handle for maximum turning leverage.
Rotate counterclockwise: Apply smooth, steady pressure counterclockwise. Do not jerk the tool sharply.
Soften stuck putty: If the flange refuses to budge, avoid leaning on it with your full body weight. Aim a hair dryer or heat gun on medium heat around the flange rim for 3 to 5 minutes to soften old, brittle plumber's putty. Alternatively, spray penetrating lubricant around the outer rim and let it sit for 15 to 20 minutes to dissolve mineral buildup.
Unthread and lift: Once the seal breaks, continue spinning the flange counterclockwise until it separates completely from the lower assembly.
Advanced Techniques: Removing Stuck, Corroded, or Damaged Flanges
In real-world bathroom renovations, older drains rarely cooperate. Mineral deposits, galvanic corrosion on brass fittings, and hardened adhesive compounds can fuse metals together.
Extracting Flanges with Broken or Stripped Cross Bars
About 20% to 30% of older drains suffer from rotted or broken crossbars that snap off as soon as you apply torque. When you have no cross members to grab onto:
Use an expandable internal drain extractor: Slide an internal drain removal tool into the open throat. As you turn the top nut counterclockwise, the knurled steel cams expand outward against the smooth inner walls of the flange, biting deeply into the metal to back it out.
Notch-and-drift method: If an extraction tool is unavailable, use a cold chisel and a hammer. Place the chisel tip at a 45-degree angle against one of the remaining internal metal ridges or flange lip. Tap gently in a counterclockwise direction to shock the threads loose.
How to Remove a Shower Drain Flange Made of Brass from Fiberglass Pans
Brass flanges installed in fiberglass, acrylic, or composite pans present a tricky challenge: brass is tough, while fiberglass is brittle and easily cracked under excessive leverage.
When a brass flange is fused with old silicone or epoxy, the safest extraction method is making precision relief cuts:
Dismantle the compression seal: If it is a no-caulk brass unit, unthread the upper brass locknut with needle-nose pliers and pull the thick rubber friction ring out from around the 2-inch pipe.
Make vertical kerf cuts: Using a mini hacksaw blade or an oscillating multi-tool with a bi-metal blade, make two vertical cuts down the inside wall of the brass drain body, spaced roughly 1 inch apart.
Critical Warning: Cut entirely through the brass drain wall, but stop immediately before touching the outer fiberglass pan or the central PVC pipe riser.
Cut the top horizontal rim: Carefully notch across the horizontal top flange between your two vertical cuts to relieve all radial tension.
Pry the relief section: Insert a flathead screwdriver under the 1-inch cut section and gently pry inward. The brass section will snap loose and lift out.
Collapse and extract: Grab the remaining drain body with locking pliers and squeeze inward. With its structural hoop strength broken, the remaining brass shell will collapse away from the pan opening without stressing the fiberglass base.
Cleaning, Prepping, and Avoiding Costly Subfloor Damage
Getting the stubborn flange out is only half the job. Installing a new drain over a rough, dirty, or damaged surface guarantees an insidious subfloor leak down the road.
Cleaning the Drain Throat and Flange Seating Area
Scrape old sealants: Use a stiff plastic putty knife or brass wire brush to remove every trace of hardened plumber’s putty, old silicone, or dried latex caulk from the pan recess.
Degrease the surface: Wipe the drain opening and the surrounding shower floor with mineral spirits or denatured alcohol to remove residue and body oils.
Inspect the waste riser: Check the top edge of the 2-inch pipe riser. It should be cut square, clean, deburred, and positioned at the correct height for your new drain kit.
Dry completely: Ensure the entire recess is bone dry before applying new silicone or plumber’s putty.
Common Removal Mistakes to Avoid
Allowing the waste shoe or lower pipe to spin: If the lower plumbing assembly spins beneath the subfloor when you turn your wrench, stop immediately. You risk snapping the trap arm or breaking solvent joints out of sight inside your ceiling cavity.
Prying aggressively against bare fiberglass: Using a screwdriver as a crowbar directly on fiberglass will chip, star-crack, or punch a hole through the gel coat. Always place a wooden block or thick rag under your prying tools to distribute pressure.
Using open flame torches: Never use a propane torch inside a fiberglass or foam shower stall. The radiant heat will warp, discolor, or melt the pan within seconds and releases toxic fumes. Stick to heat guns or hair dryers.
Using plumber's putty on ABS materials: When reinstalling your new flange, standard plumber's putty can degrade ABS plastic over time. Use 100% neutral-cure silicone for ABS assemblies.
Frequently Asked Questions About Shower Drain Flange Removal
Can I remove a shower drain flange entirely from above?
Yes. Both threaded drain bodies and compression (no-caulk) shower drains can be removed completely from above without opening up ceilings or crawlspaces below. By unthreading the compression nut, extracting the internal rubber seal, or utilizing relief cuts on the drain body, the entire assembly can be collapsed and lifted upward out of the pan.
What should I do if the drain pipe spins with the flange?
If the waste pipe below rotates when you apply torque, you must stabilize the lower plumbing. If you have access from a basement, crawlspace, or ceiling hatch below, have a helper secure the lower trap assembly using a strap wrench or large pipe wrench while you unscrew the flange from above. If access is impossible, avoid torquing and instead use internal relief cuts to section and collapse the flange without turning the pipe.
How do I prevent cracking a fiberglass or foam shower pan during removal?
Never use the rim of the shower pan as a high-pressure fulcrum for heavy pry bars. Support your tools by laying a 1x4 piece of scrap wood across the shower floor to distribute the load across a wider surface area. When dealing with high-density foam shower receptors or delicate pans, precision cutting with a hand-operated mini hacksaw is far safer than applying heavy mechanical torque.
Conclusion
Removing a stubborn, corroded shower drain flange does not have to end in an expensive plumbing emergency. By correctly identifying your assembly type, using dedicated tools like drain keys and internal extractors, and falling back on relief cuts when threads seize, you can protect both your shower base and your subfloor plumbing.
If your drain replacement is part of a full bathroom upgrade or barrier-free shower remodel, we engineer high-performance solutions designed to streamline your installation. At Shower Concepts in Englewood, Colorado, we manufacture custom foam shower pans, curbless systems, and premium drain assemblies made to order with rapid turnaround. Explore our advanced Rapid Recess point drain kit to build a dependable, 100% waterproof foundation for your next tile project.
